Introduction to Crusty Italian Bread
Why is crusty Italian bread a must-try?
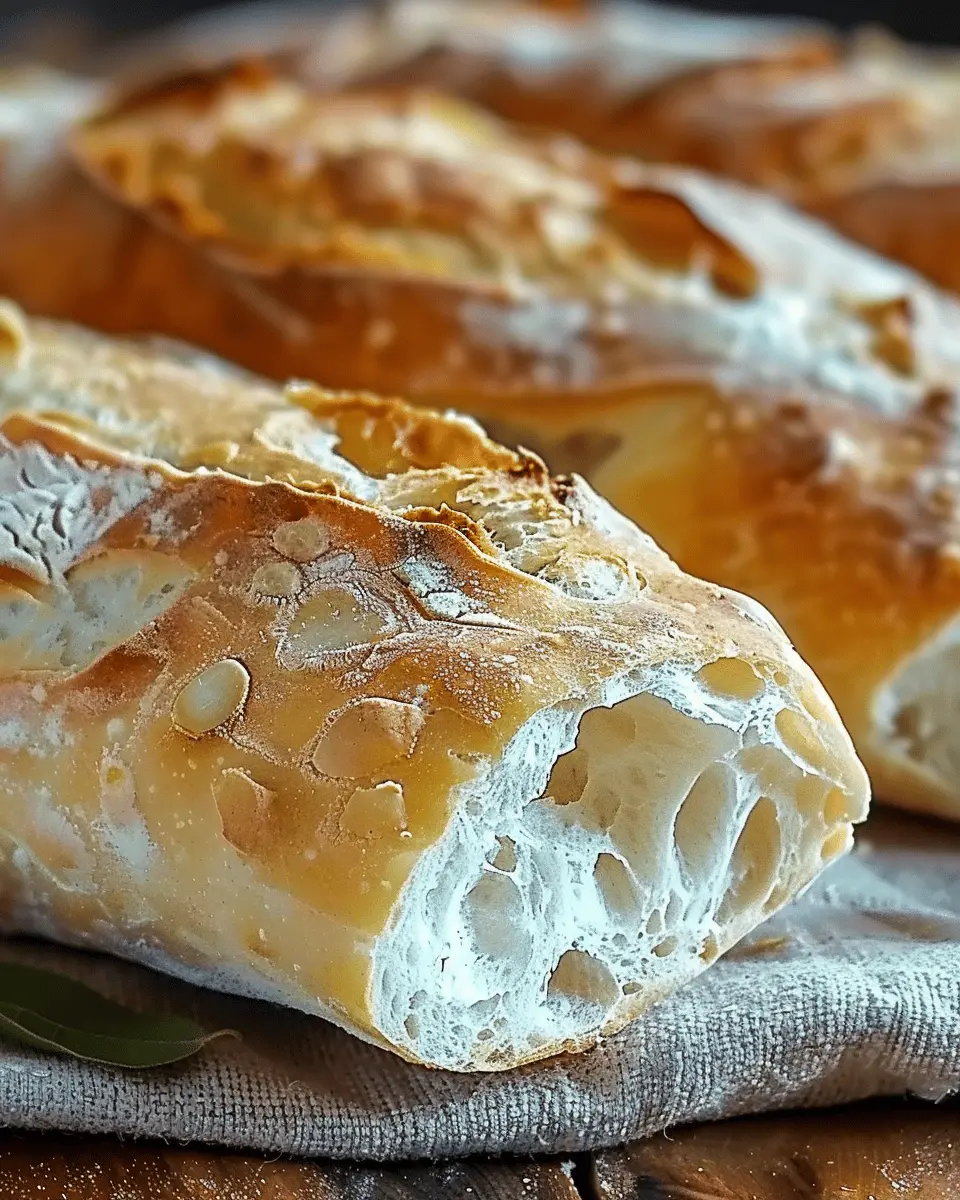
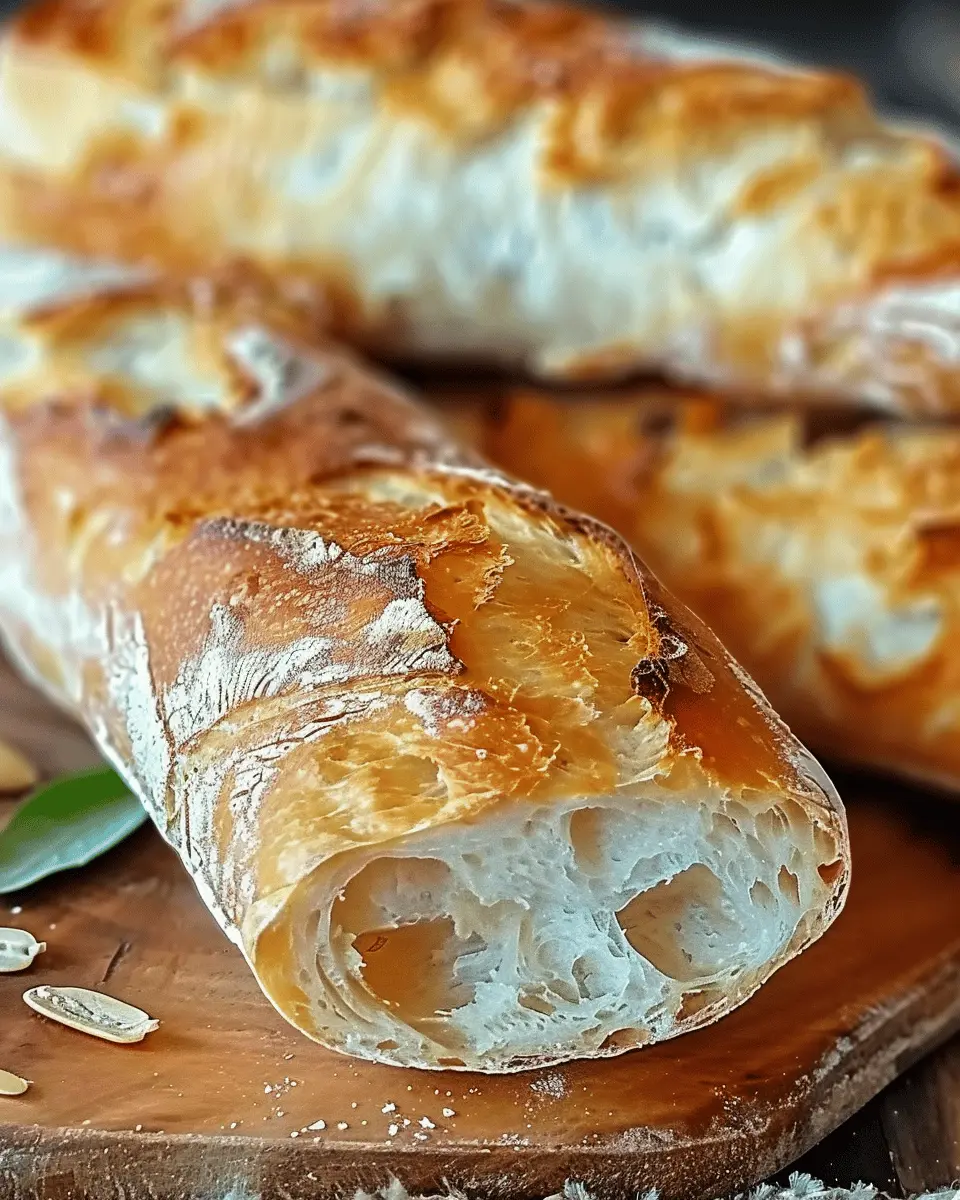
If you haven’t yet experienced the delightful crunch of crusty Italian bread, you’re in for a treat! This bread is not just a staple in Italian cuisine; it embodies centuries of tradition, flavor, and technique. With its perfectly baked golden-brown crust and soft, airy interior, it serves as the ideal companion for a variety of meals—from a simple soup to an elaborate charcuterie board.
The beauty of crusty Italian bread lies in its versatility. You can enjoy it as a sandwich base, perfect for holding savory fillings like turkey bacon or chicken ham, or simply as an accompaniment to your favorite olive oil and balsamic vinegar for dipping. According to a recent report by the American Institute of Baking, artisan breads, including Italian varieties, have surged in popularity among home bakers, and for good reason! This type of bread delights the senses and elevates any dining experience.
A personal story: My first loaf
I still remember my first attempt at baking crusty Italian bread. It was a rainy Saturday afternoon, and I was feeling adventurous. Armed with a recipe I found on an old cooking blog, I gathered my ingredients: flour, water, salt, and yeast. I felt like a novice scientist measuring everything precisely, eager yet nervous about the outcome.
After letting the dough rise, the moment finally came to shape and bake. The kitchen filled with a rich aroma as the loaf transformed in the oven. When I pulled it out, the golden crust crackled beneath my fingers—this was the moment of truth! As I sliced into it, the soft steam billowed up, filling the air. I couldn’t resist a warm slice with a drizzle of olive oil.
Not only was this my first foray into baking, but it launched a newfound passion for creating artisan bread at home. If you’re relatively inexperienced in the kitchen, don’t let that deter you—just like I did, you can embark on your own delicious adventure with crusty Italian bread! Check out this article for more tips on perfecting your baking skills and making bread at home.
Ingredients for Crusty Italian Bread
When you’re ready to create crusty Italian bread, gathering the right ingredients is key to achieving that perfect loaf with a golden crust and soft, airy center. Let’s dive into what you’ll need!
Essential ingredients you’ll need
To embark on your crusty Italian bread journey, consider these foundational ingredients:
- Bread Flour: High-gluten flour helps achieve that glorious chewiness.
- Water: Preferably at room temperature, this hydrates your dough for a better rise.
- Yeast: Active dry or instant yeast works wonders for that fluffy texture.
- Salt: Essential for flavor and regulating yeast activity – don’t skip this!
- Olive Oil: Just a splash adds richness and depth.
These staples come together beautifully and are often found in most kitchens. Need a deep dive into yeast types? Check out this article on types of yeast.
Optional add-ins for flavor
While the basics are fantastic, why not elevate your crusty Italian bread with some delightful optional ingredients? Here are a few suggestions:
- Herbs: Rosemary, thyme, or basil can amplify the aroma and taste.
- Olives or sun-dried tomatoes: These not only add flavor, but a wonderful textural contrast as well.
- Cheese: Consider adding grated Parmesan or even bits of mozzarella for extra creaminess.
Feel free to get creative—these ingredients turn a simple bread into something unique and delicious, perfect for hearty meals or simply to enjoy with olive oil and balsamic vinegar!
Step-by-step Preparation of Crusty Italian Bread
Making crusty Italian bread at home is an experience that can turn any day into a special occasion. The aroma of freshly baked bread fills your kitchen with warmth and comfort, and each bite delivers a satisfying crunch followed by a soft, fluffy interior. Let’s break down the preparation into easy-to-follow steps that will have you mastering this classic recipe in no time!
Activate the yeast
To kick things off, you need to activate your yeast, which is critical for getting that lovely rise. Here’s how:
- In a small bowl, combine 2 teaspoons of active dry yeast with about 1 cup of warm water (between 100°F and 110°F is ideal).
- Add a pinch of sugar to the mixture, which will give the yeast a little boost to start fermenting.
- Let it sit for about 5 to 10 minutes or until it’s frothy. If your yeast doesn’t foam, it might be dead—don’t use it!
For more details on yeast activation, check out resources from the King Arthur Baking Company.
Mix dry ingredients with the yeast mixture
Now that your yeast is ready, it’s time to combine it with the dry ingredients. In a large mixing bowl:
- Add 4 cups of all-purpose flour, 1 ½ teaspoons of salt, and any additional flavorings like herbs or garlic powder (if you’re feeling adventurous!).
- Pour in your activated yeast mixture and stir with a wooden spoon or spatula until a shaggy dough forms.
Knead the dough like a pro
Kneading is essential for developing gluten, which gives your crusty Italian bread its chewy texture. Following these steps will help:
- Transfer the shaggy dough onto a lightly floured surface.
- Knead it for about 8-10 minutes. Use the heel of your hand to push the dough away from you, fold it back over itself, and turn it. Repeat until it’s smooth and elastic.
Pro tip: If you have a stand mixer, you can use the dough hook attachment to save some energy!
First rise: Let it double in size
Once you’ve kneaded your dough, it’s time for the first rise, which will help develop flavor and texture.
- Place the dough in a lightly oiled bowl, cover it with a damp cloth or plastic wrap, and let it rise in a warm place for about 1 to 2 hours until it doubles in size.
- If you want to create a warmer environment, you can let it rise in an oven that’s turned off—just remember to take it out before preheating!
Preheat the oven and prepare for baking
Preheating your oven is vital for achieving that perfect crust. About 30 minutes before your dough is done rising, preheat your oven to 450°F (232°C).
- If you can, place a baking stone or a baking sheet in the oven to heat up as well. This will help create a beautiful crust.
Shape the loaf and allow for final rise
After the dough has doubled, you’ll need to punch it down gently to release excess air.
- Shape it into a round or oval loaf, and place it on a parchment-lined baking sheet.
- Cover the shaped loaf with a cloth and allow it to rise for another 30 minutes.
Scoring the loaf for that perfect crust
Scoring the top of your loaf before baking helps control how the bread expands as it bakes, giving it that signature artisan look.
- Use a sharp knife or a serrated bread knife to make shallow cuts across the top of the loaf.
Bake and achieve crusty perfection
Finally, it’s time to bake!
- Carefully transfer your loaf into the preheated oven.
- For a crispier crust, you can place a pan of hot water on the bottom rack to create steam.
- Bake for about 25-30 minutes or until the bread is golden brown and sounds hollow when tapped on the bottom.
Once done, let your bread cool on a wire rack. Enjoy your homemade crusty Italian bread with your favorite spread, or use it for delicious sandwiches or bruschetta!
With these steps, you’ll be well on your way to mastering homemade Italian bread—bon appétit!

Variations on Crusty Italian Bread
When it comes to crusty Italian bread, the possibilities are tantalizing! Let’s dive into two delicious variations that will elevate your bread-making game and add a unique twist to your meals.
Herb-infused Crusty Italian Bread
Why settle for plain when you can bring the aroma of the Italian countryside into your kitchen? By adding fresh herbs like rosemary, thyme, or basil, you can transform your crusty Italian bread into a fragrant delight.
- Herb suggestions:
- 2 tablespoons of chopped fresh rosemary
- 2 tablespoons of thyme
- Instructions: Mix your selected herbs into the dry ingredients before adding water. The result is an aromatic crust that will elevate any dish.
Paired with a homemade olive oil dip, this variation becomes a fantastic starter for dinner parties or a delightful snack during movie nights. Just imagine tearing into that crusty loaf while the herbal notes waft through the air!
Olive and Sun-dried Tomato Variation
If you love Mediterranean flavors, this variation will win your heart. Adding chopped olives and sun-dried tomatoes to your crusty Italian bread batter infuses the bread with rich, savory notes.
- Ingredients to add:
- ¾ cup of chopped olives (green or Kalamata)
- ½ cup of chopped sun-dried tomatoes, packed in oil
- Instructions: Fold these ingredients into the dough after the first rise. This ensures they’re evenly distributed and every bite is bursting with flavor.
This bread shines when served alongside a mezze platter or as a savory component in sandwiches. Think about it—turkey bacon and arugula on a slice of this delight is an instant win!
Feel free to explore these variations and let your creativity lead the way! For even more inspiration, check out resources like Serious Eats or The Kitchn for your next culinary adventure!
Cooking Tips and Notes for Crusty Italian Bread
How to Determine if the Bread is Done
When baking crusty Italian bread, the look and sound are your best guide. The crust should be golden brown and firm, while the interior should sound hollow when tapped. If you’re unsure, an instant-read thermometer can be a lifesaver—your target internal temperature is around 200°F (93°C). Don’t just go by time; this ensures your bread is baked to perfection.
Troubleshooting Common Bread-Making Issues
Even seasoned bakers face challenges. Here are some common hiccups:
- Bread Too Dense: This could be due to under-kneading. Ensure you develop that gluten by kneading adequately. A dough that pulls away cleanly is a good sign.
- Soggy Bread: If your crusty Italian bread is too moist, consider reducing the water next time or extending the baking time slightly.
- Flat Loaves: Make sure to let the dough rise properly—yeast needs time to work its magic. A warm, draft-free spot is ideal.
If you need more guidance, resources like King Arthur Baking can provide extensive tips on bread-making basics. Happy baking!
Serving Suggestions for Crusty Italian Bread
Best pairings for crusty Italian bread
Crusty Italian bread is a delightful centerpiece for any meal. Imagine tearing off a warm piece and dipping it into a robust olive oil infused with herbs. Pair it with marinated vegetables or a fresh caprese salad for a classic Mediterranean experience. If you’re feeling adventurous, it can complement a savory soup, such as tomato basil or minestrone, perfectly soaking up all those flavors. Alternatively, consider topping a slice with turkey bacon, chicken ham, or even a zesty hummus for a creative twist.
Creative ways to use leftover bread
Don’t let any leftover crusty Italian bread go to waste! Transform it into croutons by cubing and toasting with your favorite spices—perfect for salads or soups. How about whipping up a comforting bread pudding? The possibilities are endless! You can even make a delicious bruschetta by toasting slices and topping them with diced tomatoes, basil, and a drizzle of balsamic reduction. Creativity is key, so don’t hesitate to explore more ideas on Food Network or other culinary sites for inspiration.
Time Breakdown for Crusty Italian Bread
When preparing to bake your crusty Italian bread, it’s handy to have an understanding of the time involved. Here’s how it breaks down:
Preparation Time
The initial prep takes about 15 minutes. Measure your ingredients, mix, and knead the dough to get started on this delicious journey.
Rising Time
Patience is key here! Allow your dough to rise for about 1.5 to 2 hours. This process is crucial for developing that perfect texture, so resist the urge to rush.
Baking Time
The baking portion usually requires around 30 to 35 minutes. This is when your kitchen will start smelling heavenly!
Total Time
From start to finish, you’re looking at about 2.5 to 3 hours. While that may seem daunting, much of this time is hands-off while your dough does its magic.
For more tips on achieving the perfect crust, check out King Arthur Baking. Enjoy the process and the eventual reward of that delightful loaf!
Nutritional Facts for Crusty Italian Bread
Calories per slice
If you’re wondering about the calorie count of crusty Italian bread, you’ll be delighted to know that a typical slice contains about 80-100 calories. This makes it a great base for sandwiches or a perfect side to your favorite soup without breaking your calorie bank.
Nutritional breakdown
When it comes to the nutritional details, here’s what you can expect per slice:
- Carbohydrates: Approximately 15-20 grams, depending on the flour used. This makes it a good energy source.
- Protein: Roughly 2-4 grams, which is decent for a bread.
- Fat: Minimal, usually around 1 gram, contributing to heart health.
- Fiber: Typically 1 gram, ideal for digestion.
Incorporating crusty Italian bread into your meals can be a wholesome choice, especially when paired with healthy toppings like avocado or turkey bacon. Curious about healthy bread options? Check out this link for a more comprehensive look at bread varieties.
Enjoy your baking!
FAQs about Crusty Italian Bread
Can I use whole wheat flour instead?
Absolutely! Using whole wheat flour in your crusty Italian bread recipe can add a nutty flavor and increase the nutritional profile. However, keep in mind that it may affect the texture, making the bread denser. For the best results, consider blending whole wheat flour with all-purpose flour—this combination can give you the hearty taste of whole grains while maintaining that sought-after crusty texture.
What’s the best way to store homemade crusty bread?
Storing your homemade crusty bread properly ensures it stays fresh longer. Here are some effective tips:
- Cool First: Always let your bread cool completely before storing it. This prevents moisture from making the crust soggy.
- Paper Bag: For short-term storage (up to a few days), place your bread in a paper bag to allow it to breathe, preserving its delicious crust.
- Freezer: For longer storage, wrap the bread tightly in plastic wrap and then in aluminum foil before freezing. To enjoy fresh bread later, simply thaw it at room temperature and reheating in the oven for that crisp crust.
For more information on bread storage, check out this Bread Storage Guide.
How do I keep the crust nice and crispy after baking?
To maintain that beautiful crisp crust on your crusty Italian bread, consider these straightforward techniques:
- Steam in the Oven: Before baking, add a pan of water to the bottom of the oven. The steam helps develop a crispy crust.
- Cooling Rack: After baking, cool your bread on a wire rack. This allows air circulation, preventing moisture accumulation on the crust.
- Reheat in the Oven: If your bread loses its crunch, try reheating it in a hot oven for a few minutes. This can restore that delightful texture.
Making your own crusty Italian bread not only fills your home with an amazing aroma but also provides a satisfying culinary experience. Enjoy the process!
Conclusion on Crusty Italian Bread
Final thoughts and encouragement to try the recipe
Baking crusty Italian bread at home is not just a culinary adventure; it’s a way to bring the flavors of Italy into your kitchen. Whether you’re accompanying a cozy dinner or simply enjoying a slice with one of your favorite spreads, this bread elevates any meal.
Don’t hesitate to give this recipe a try! With a few simple ingredients and some patience, you’ll be rewarded with a delicious loaf that boasts a perfect crust and airy interior. Plus, think of the joy you’ll feel pulling your own warm, fragrant bread from the oven. If you’re looking for more tips on perfecting your bread-baking skills, check out resources like King Arthur Baking or Serious Eats. Happy baking!
PrintCrusty Italian Bread: The Best Homemade Recipe for Beginners

Learn how to make the best homemade Crusty Italian Bread with this beginner-friendly recipe! Perfect for any meal.
- Prep Time: 20 minutes
- Cook Time: 30 minutes
- Total Time: 1 hour 50 minutes
- Yield: 1 loaf 1x
- Category: Bread
- Method: Baking
- Cuisine: Italian
- Diet: Vegetarian
Ingredients
- 4 cups all-purpose flour
- 1 1/2 cups warm water
- 2 teaspoons salt
- 1 teaspoon sugar
- 2 teaspoons active dry yeast
Instructions
- In a large bowl, combine warm water, sugar, and yeast. Let it sit for about 5 minutes or until frothy.
- Add salt and flour, and mix until a dough forms.
- Knead the dough on a floured surface for about 10 minutes.
- Place dough in a greased bowl, cover, and let it rise in a warm place for about 1 hour.
- Preheat oven to 450°F (232°C).
- Punch down the risen dough and shape it into a round loaf.
- Place the loaf on a baking sheet lined with parchment paper, and let it rise for an additional 30 minutes.
- Score the top of the loaf with a sharp knife.
- Bake in the preheated oven for 30 minutes or until crusty and golden brown.
Notes
- For an extra crispy crust, place a pan of water in the oven while baking.
- You can also add herbs for additional flavor.
Nutrition
- Serving Size: 1 slice
- Calories: 120
- Sugar: 1g
- Sodium: 200mg
- Fat: 1g
- Saturated Fat: 0g
- Unsaturated Fat: 1g
- Trans Fat: 0g
- Carbohydrates: 24g
- Fiber: 1g
- Protein: 4g
- Cholesterol: 0mg
Keywords: Crusty Italian Bread, homemade bread, beginner recipe